Android is not just a device you tap-it can think for you. Android automation’s advanced functions allow you to program tasks to be performed when a specified condition is met which will allow you to save a great amount of time and effort on many routine tasks.
Android automation and app launchers are the best tools to make repetitive manual operations effortless and hands-free. Whether you’re aiming for automating network settings or launching the most-loved apps depending on your location. In this tutorial, we will dive deep into Android automation, how you can set it up, real-life workflows to implement, and tools that you’ll be looking forward to in 2026.
Table of Contents
Who This Guide Is For
This article is for Android users who want their phone to do more with less manual interaction — whether you’re a productivity seeker or a curious intermediate user ready to build practical automation.
Who Should Be Cautious
If you prefer full manual control, are wary of granting accessibility or background permissions, or want to avoid features that run continually in the background, start with simple macros and proceed slowly.
What Is Android Automation?
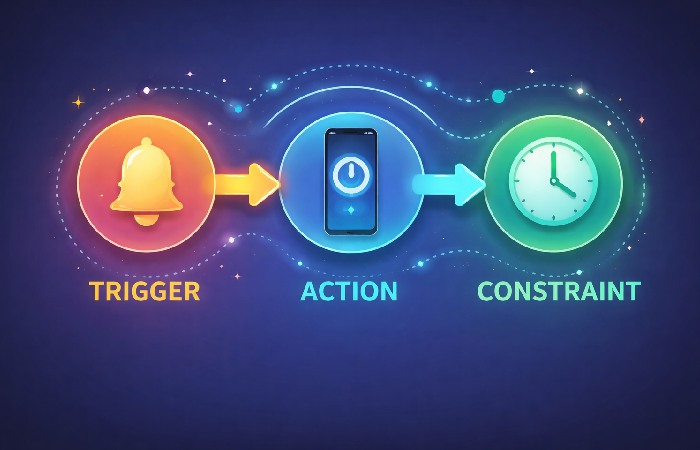
Android automation lets you define rules that automatically perform tasks when specific conditions are met. Most automation tools use a structure consisting of:
-
Trigger: An event that kicks off the workflow.
-
Action: The task your device performs.
-
Constraint: Optional conditions that limit when the action runs.
For example: When your phone connects to your car’s Bluetooth (trigger), enable Wi-Fi and launch navigation (actions), but only during work hours (constraint). This simple structure — “trigger → action → constraint” — is central to apps like MacroDroid.
Why You Should Automate Android Tasks
Automation turns routine steps into automatic responses, helping users:
-
Save time by eliminating repetitive taps.
-
Enhance productivity by letting your device adapt to context.
-
Reduce distraction by silencing notifications or shifting modes automatically.
Users frequently automate tasks like connectivity changes and daily profiles using tools like Tasker, MacroDroid, and Automate.
Comparison of Top Android Automation Tools (2026)
Here’s how popular Android automation apps stack up:
| Tool | Best For | Ease | Power | Pricing |
|---|---|---|---|---|
| Tasker | Deep logic & customization | Moderate–Hard | Very High | Paid/Trial |
| MacroDroid | Everyday automation & templates | Easy | Moderate | Free + Paid |
| Automate | Visual logic workflows | Moderate | Moderate | Free / Optional Paid |
| IFTTT | Cross-app & IoT integration | Easy | Moderate | Free + Paid |
This mix offers options for both beginners and advanced users.
Tool Descriptions & Uses
Tasker — Deep Customization
Tasker is often considered the gold standard for on-device automation because it lets you define conditions based on time, location, app state, events, and more, then link them to sequences of actions.
Best for: Users who want unmatched control.
Considerations: More complex and steeper learning curve.
MacroDroid — Beginner-Friendly Macros
MacroDroid uses the “trigger → action → constraint” model with a simple user interface. It offers a large library of triggers and actions — like connectivity changes and sensor triggers — and even templates to help you start.
Best for: Everyday automation and quick workflows.
Note: The free app shows ads and limits macros.
Automate — Visual Flow Logic
Automate lets you create automation using flowchart blocks, which many users find intuitive and visually clear. It supports tasks like managing files, phone settings, or scheduling actions based on time or location.
Best for: Users who prefer visual workflow design.
IFTTT — Cross-App & Smart Integration
IFTTT (“If This Then That”) connects automation not only on your Android device but also across apps and smart home services, enabling broader workflows. For example, you can trigger actions in smart devices when your phone connects to Wi-Fi.
Best for: Combining phone triggers with web and IoT devices.
How Android Automation Works (Mechanics Explained)
Automation apps run in the background and monitor system events (like time, location, connectivity). When a condition matches a defined trigger, the automation engine checks any constraints, and if they pass, it executes the specified actions.
For instance:
-
Trigger: Phone connects to Bluetooth device.
-
Constraint: Only after 6 PM.
-
Actions: Turn on Wi-Fi and launch your favorite music app.
You can string multiple triggers and constraints to build rich, context-aware workflows.
If you want a concrete, testing-focused walkthrough of building and running your first mobile test, this Android Appium test tutorial from Applitools shows the full process on a real Android app.
Step-by-Step: Build Your First Automation Workflow
Here’s a practical example using MacroDroid:
-
Open MacroDroid and tap New Macro.
-
Choose a Trigger, like Bluetooth connected.
-
Add Actions, such as enable Wi-Fi or open an app.
-
Add Constraints like only on weekdays.
-
Save and Test your macro.
This same logic applies across most automation tools — only the UI changes.
Real-World Automation Examples
Here are useful workflows you can try:
-
Auto Wi-Fi at Home: Enable Wi-Fi when entering your home area.
-
Bluetooth Car Routine: Launch podcasts when your car’s Bluetooth connects.
-
Work Timer: Enable Do Not Disturb during work hours.
Case Study: Commute Profile in Tasker
Imagine you want your evening commute to “just happen” when you get in the car. A simple Tasker profile might:
-
Trigger: Car Bluetooth connects after 5 PM on weekdays.
-
Actions: Turn on GPS, set screen brightness to 70%, open your maps app, and start your usual route home.
-
Constraints: Only if battery is above 25% and you’re not already connected to office Wi‑Fi.
In practice, you may need to tweak it. Some users find that their car’s Bluetooth connects briefly while parked near home, which can launch navigation too early; tightening the time window or adding a location constraint fixes this.
Case Study: Workday Focus Mode in MacroDroid
MacroDroid can handle a full “work mode” with just a few blocks:
-
Trigger: Link to the office WiFi during business hours (9 am-6 pm) on weekdays.
-
Actions: Mute your phone, decrease ringtone volume, vibrate mode, and start the calendar or a note application.
-
Conditions: Screen unlocked, so it doesn’t work when you’re just walking by the building.
The first version might be too aggressive and silence notifications during lunch or meetings outside the office. You can refine it by adding a location radius or excluding certain time ranges so it feels helpful instead of restrictive.
Advanced Android Automation Examples (For Power Users)
Okay, now you know how to do the basic stuff. What about adding more? What if you want to do several things at once and you want to throw in some choices? That’s where multi-step workflows come in. Here are a few examples:
Morning Motivation (using Tasker or Automate):
- 7:30am (Mon-Fri)
- Unmute sound, crank media volume up.
- Read out your calendar appointments for today.
- Open up your to-do list.
The Daily Commute (using MacroDroid, maps, and music):
- Car’s Bluetooth connects AND it’s 8:00am – 10:00am.
- Turn on GPS.
- Start navigating to your workplace.
- Medium screen brightness.
- Open your podcast player app.
The Battery Preservation Mode (using Tasker):
- Battery below 20% AND not plugged in.
- Turn off Wi-Fi & Bluetooth.
- Decrease screen brightness.
- Stop syncing selected apps in the background.
- Load a super-minimalist home screen.
These kinds of multi-step chains are what separate basic automation from true “let my phone think for me” workflows.
Phone Automation at Scale and Across Devices
Most people only automate a single physical phone, but some use Android automation at scale across many devices or cloud phones. Instead of holding a stack of phones, you run Android in the cloud and push the same workflows to dozens of virtual devices.
Cloud-phone platforms and device farms let you:
-
Spin up multiple Android environments, each with its own IP, apps, and settings.
-
Run the same automation script on many “phones” at once.
-
Trigger automations, don’t tap buttons. You don’t need it, but what if you have to deal with dozens of clients? What if you test apps on a dozen devices?
What if you’re running big marketing automation campaigns? If so, your Tasker-like apps on the device are just one cog in a much bigger machine.
Automation for Testing and QA
For testing and QA teams, Android automation is also critical for scaling app testing across many devices and environments without manually handling physical phones. Guides on how to automate Android apps using frameworks like Appium, such as this tutorial on how to automate Android apps using Appium, show how the same test scripts can run on emulators, real devices, and cloud grids, which mirrors how cloud-based Appium runs are described in the official Appium on real device clouds documentation.
Tool Decision Framework — How to Pick
If you’re wondering “Tasker vs MacroDroid vs Automate vs IFTTT — which is best?”, use this simple breakdown:
-
Choose Tasker if you want maximum control: Best for power users who are happy to learn a more complex interface in exchange for deep logic, plugins, and almost unlimited customization.
-
Choose MacroDroid if you want fast wins with minimal learning: Best for beginners and busy users who just want reliable everyday automation using a clear UI and templates.
-
Choose Automate if you think in flowcharts: Best for visual thinkers who prefer drag‑and‑drop flow blocks and still want fairly advanced logic without scripting.
-
Choose IFTTT if you care most about cross‑app and smart home integrations: Best for connecting your Android triggers to web apps and IoT devices like smart lights, plugs, and home hubs.
You don’t have to marry one app forever. Many users test two or three tools and keep the one that fits their brain and their daily routines best.
Common Mistakes & How to Avoid Them
-
Overly Broad Triggers: If triggers are too general, workflows may fire at the wrong times — refine them with constraints.
-
Battery Usage: Some triggers (like frequent sensor checks) may affect battery life — optimize your conditions.
-
Permissions: Some automation requires additional permissions to work reliably — grant only what’s necessary.
Device Quirks, Battery Optimization, and Permissions
Since Android has introduced new features to kill apps running in the background in order to preserve battery power, automation apps are occasionally the innocent victims. If you find that your automations are kicking on and off at random, then you’ll need to do the following:
- 1. Battery optimization. So there’s this thing called battery optimization on my phone and what it does is it puts apps into a sleep state so that they don’t constantly run in the background. But what that means for apps like Tasker, MacroDroid, Automate, all of those other automation apps is that they won’t be around to do their triggered action. So first, I go to battery optimization on my phone settings, and then I change it to ‘Not optimized’ for each one of these apps.
- Make sure these apps are allowed to run in the background, with their notification or service kept alive, so they can reliably fire triggered actions.
Permissions change on Android with every release. Some automation actions, now need specific accessibility, notification, precise location, or special settings permissions. Without these, your automation may fail quietly. When prompted, always carefully consider and grant permissions only if your workflow absolutely needs them.
Practical Expectations
Simple macros take just minutes to set up. More complex workflows — especially with multiple triggers and many actions — can take longer to refine. Tools like Tasker require time to learn but reward you with powerful capabilities once mastered.
Security & Permission Considerations
Automation apps often need accessibility or background permissions to perform actions. Only install trusted apps from official sources like Google Play, and review permission prompts carefully. Given their deep access to system functions, treat them like you would any app that interacts with sensitive device settings.
FAQs About Android Automation
1. What is Android automation?
Android automation uses apps that perform tasks automatically when defined triggers occur, such as connectivity changes or time-based events.
2. Do I need coding skills for Android automation?
No — tools like MacroDroid and Automate offer visual rule builders or templates that do not require coding.
3. Which automation app is easiest for beginners?
MacroDroid is widely considered beginner-friendly due to its clear UI and templates.
4. Can automation affect battery life?
Automation apps monitor events in the background; poorly optimized triggers can impact battery life. Refine triggers and constraints to minimize this.
5. Can Android automation connect to smart home devices?
Yes — tools like IFTTT enable workflows that integrate Android actions with smart home systems and web services.
Conclusion
Advanced Android automation helps your device handle routine tasks for you, saving time and effort by responding to your triggers and preferences. By understanding how automation works and choosing the right tools — from easy starters like MacroDroid to powerful options like Tasker — you can build workflows that make your Android device more useful and efficient.