You want lighter ends — that sun-kissed gradient that looks effortless. But bleaching your natural hair means dryness, breakage, and monthly salon visits that drain your time and budget.
Ombre hair extensions solve that problem entirely. They give you a seamless dark-to-light colour transition without a single drop of bleach touching your own hair. Whether you want subtle caramel tips or a bold blonde contrast, the right set of ombre extensions delivers the look in minutes, not hours.
This guide walks you through every decision: which extension type fits your lifestyle, how to match shades to your undertone, what separates quality Remy hair from cheap alternatives, and how to make your investment last. It’s built for first-time buyers and experienced extension wearers alike.
Table of Contents
Quick Take Aways
- What are ombre extensions? → Hair pieces with a gradual dark-to-light colour gradient that blend with your natural hair
- Which type should I choose? → Clip-in for temporary wear; tape-in for semi-permanent blending; sew-in for long-term hold
- How do I match my shade? → Match the extension’s root colour to your natural hair first, then pick your preferred end-colour contrast
- What do they cost? → $30-$500+ depending on type, length, and hair quality
- Who should skip them? → Those with very fine or damaged hair (avoid sew-ins) or anyone wanting a single solid colour
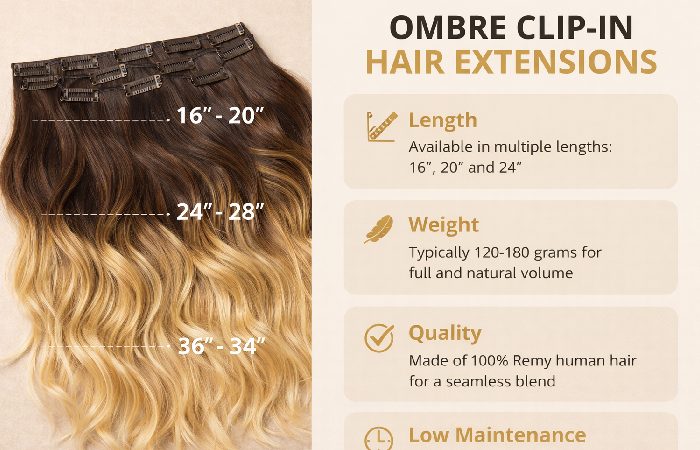
What Are Ombre Hair Extensions?
Ombre hair extensions are hair pieces that feature a gradual colour transition from darker roots to lighter ends. Derived from the French word for “shaded,” the ombre technique allows wearers to achieve a multi-tonal, sun-kissed look without chemically treating their natural hair. They’re available in clip-in, tape-in, sew-in, and bonded application methods.
How the Ombre Colour Gradient Works
The gradient effect is created during manufacturing. Extension hair — typically starting as a single dark shade — is sectioned and the lower portions are lightened through a controlled bleaching process. Colour is then deposited to achieve the target end shade.
The transition point (where dark meets light) usually falls around the mid-length of the extension. Higher-quality extensions feature a gradual, hand-blended transition zone spanning several inches. Budget options tend to have a more abrupt shift, which can look less natural.
Ombre vs Balayage vs Dip-Dye: Key Differences
These three terms are constantly confused. Here’s what actually separates them:
| Feature | Ombre | Balayage | Dip-Dye |
|---|---|---|---|
| Colour transition | Horizontal, whole-head gradient | Freehand, scattered highlights | Sharp, abrupt colour change |
| Look | Bold, two-toned contrast | Soft, sun-kissed natural | Dramatic, fashion-forward |
| Transition line | Visible but blended | Nearly invisible | Hard, defined line |
| Maintenance | Low | Low | Medium |
| Best for | Clear colour change without bleaching your own hair | Subtle, lived-in dimension | Bold, statement colour |
The key distinction: ombre transitions the entire bottom section from one shade to another. Balayage “sweeps” lighter pieces throughout the hair for scattered brightness. Dip-dye creates an intentional, sharp break between two colours.
If you want a uniform gradient with clean contrast, ombre extensions are the right choice. If you prefer scattered, painterly highlights, balayage extensions are a better fit.
Types of Ombre Hair Extensions
Not all ombre extensions work the same way. Your choice depends on how long you want to wear them, your daily routine, and how much you’re willing to invest.
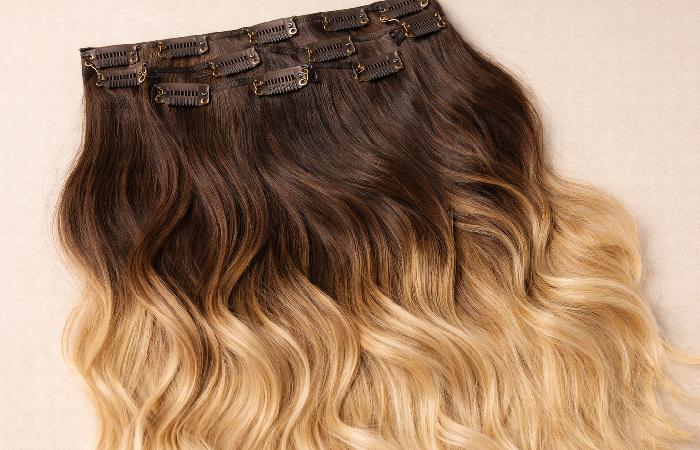
Clip-In Ombre Extensions
Clip-in extensions use small pressure clips attached to wefts of hair. You snap them into sections of your own hair and remove them at the end of the day.
- Commitment level: None — apply in minutes, remove before bed
- Best for: Events, weekends, experimenting with ombre before committing
- Lifespan: 3-6 months with proper care
- Damage risk: Very low
This is the go-to option for anyone new to ombre extensions. No salon visit required.
If you have existing hair loss, scalp sensitivity, or a history of traction alopecia, talk to a dermatologist or licensed stylist before choosing sew-in extensions.
Tape-In Ombre Extensions
Tape-in extensions use thin, adhesive-backed wefts that sandwich small sections of your natural hair. They sit flat against the scalp, making them nearly undetectable.
- Commitment level: Semi-permanent (6-8 weeks between reapplication)
- Best for: Daily wear with a seamless, natural look
- Lifespan: 4-8 months (wefts can be reused with fresh adhesive)
- Damage risk: Low to moderate — adhesive can weaken fine hair over time
Professional installation is required. But the payoff is a blend that looks like your own hair.
Sew-In (Weave) Ombre Extensions
Sew-in extensions are stitched onto cornrow braids created from your natural hair. They’re the most secure method available.
- Commitment level: High — typically worn 6-8 weeks continuously
- Best for: Maximum volume, long-term daily wear, thicker hair types
- Lifespan: 6-8 weeks per install (wefts can be reused)
- Damage risk: Moderate to high — tension on braids can cause traction alopecia if too tight
Sew-ins deliver the fullest result. But they’re not suitable for fine or thinning hair due to the weight and tension involved.
Keratin Bond & Micro-Ring Options
Keratin (fusion) bonds attach individual strands using a heat-activated keratin adhesive. Micro-ring extensions use tiny metal beads crimped around both the extension strand and your natural hair.
- Commitment level: High — lasts 3-5 months
- Best for: Natural movement, strand-by-strand blending
- Lifespan: Typically 3-5 months before removal and reapplication, depending on hair quality and care.
- Damage risk: Moderate — heat application and bead tension can stress hair
Both methods offer exceptional blending but require professional application and removal.
Extension Type Comparison: At a Glance
| Type | Application | Duration | Cost Range | Best For | Maintenance |
|---|---|---|---|---|---|
| Clip-in | Self (minutes) | Temporary (varies by use and care) | $30–$200 | Beginners, events | Very low |
| Tape-in | Salon (30–60 min) | Typically 6–8 weeks | $150–$400 | Daily seamless wear | Low–medium |
| Sew-in | Salon (2–4 hours) | Typically 6–8 weeks | $100–$350 | Maximum volume | Medium |
| Keratin bond | Salon (2–4 hours) | Typically 3–5 months | $200–$500+ | Natural strand movement | Medium–high |
| Micro-ring | Salon (2–3 hours) | Typically 3–4 months | $200–$450 | Heat-free bonding | Medium |
Cost-per-wear example: A $150 clip-in set worn 50 times = $3 per wear. A $350 tape-in set worn daily for 8 weeks (56 days) = $6.25 per wear. For daily wearers, tape-ins offer better value. For occasional use, clip-ins win.
These examples refer to hair cost only and do not include stylist installation, maintenance appointments, or haircare products.
How to Choose the Right Ombre Shade
Colour matching is where most first-time buyers make mistakes. The wrong shade doesn’t just look unnatural — it makes the extensions obvious.
Matching Your Root Colour
Rule one: match the extension’s dark end to your natural roots. The lighter tips can be any shade you want, but the root colour must blend seamlessly where the extension meets your hair.
Hold the extension against your hair near natural light — not under bathroom bulbs, which distort warm and cool tones. If the root section is even two shades off, the extension will look disconnected.
Understanding Warm, Cool, and Neutral Undertones
Your undertone determines which ombre combinations will look harmonious on you:
- Warm undertones (golden, peachy, yellow-toned skin) → Look best with caramel, honey, golden blonde, and copper ombre ends
- Cool undertones (pink, blue, or red-toned skin) → Suit ash brown, platinum blonde, silver, and ashy ombre transitions
- Neutral undertones → Can wear both warm and cool shades — chocolate brown to sandy blonde is a versatile choice
Quick test: Check the veins on your inner wrist. Blue-purple veins suggest cool undertones. Green veins suggest warm. A mix points to neutral.
Popular Ombre Colour Combinations
| Root Colour | End Colour | Contrast Level | Best Skin Tone |
|---|---|---|---|
| Natural black | Chocolate brown | Subtle | All |
| Dark brown | Caramel | Medium | Warm |
| Dark brown | Ash blonde | High | Cool |
| Chestnut brown | Honey blonde | Medium | Warm/Neutral |
| Black | Platinum blonde | Very high | Cool |
| Auburn | Copper gold | Subtle | Warm |
| Dark brown | Rose gold | Medium-high | Cool/Neutral |
Seasonal consideration: warm tones (caramel, honey, copper) tend to complement summer and autumn wardrobes. Cool tones (ash, platinum, silver) pair well with winter and spring palettes.
What to Look For in Quality Ombre Extensions
Remy Human Hair vs Synthetic — Why It Matters
Remy human hair is the gold standard. The term “Remy” means the hair cuticles are kept intact and aligned in the same direction — root to tip. This cuticle alignment is what prevents tangling, matting, and that unnatural “plastic” sheen.
Extensions made from cuticle-aligned Remy hair can be heat-styled, coloured, and washed just like your natural hair. They last significantly longer than synthetic alternatives.
Synthetic extensions cost less upfront but can’t handle heat styling, tend to tangle within weeks, and have a visible artificial sheen. For ombre specifically, synthetic colour transitions often look harsh and fade quickly.
The bottom line: If you plan to curl, straighten, or wear your extensions regularly, invest in Remy human hair. The upfront cost pays for itself in longevity.
How to Spot Low-Quality Extensions Before You Buy
Budget ombre extensions often use acid-washed hair — strands stripped of their natural cuticle using acid baths, then coated in silicone. They feel silky at first. But once the silicone washes off (usually within 5-10 washes), the hair becomes dry, tangled, and unmanageable.
Red flags to watch for:
- Price that seems too low for human hair (for a full-head human hair set, prices far below typical market ranges can be a warning sign)
- Excessive shine straight out of the package (silicone coating)
- No mention of “Remy” or “cuticle-intact” on the product listing
- Colour that looks painted-on rather than gradually blended
- Hair strands that feel coated rather than naturally soft
How to Apply and Style Ombre Hair Extensions
Step-by-Step Application (Clip-In)
- Section your hair — Create a horizontal part about 1 inch above the nape of your neck using a tail comb
- Open the clips — Snap each clip on the weft open by pressing the centre
- Attach the weft — Place the weft along your part line, close to the roots. Snap each clip shut onto your natural hair
- Release and blend — Let down the next section of hair (about 1 inch above the first weft). Repeat with the next weft
- Work upward — Continue parting, clipping, and releasing until all wefts are in place
- Blend the transition — Use your fingers or a wide-tooth comb to blend the ombre transition point with your natural hair
- Style as desired — Curl or straighten to unify the texture between your natural hair and the extensions
Pro tip: Start with fewer wefts and add more only if you need additional volume. Over-clipping can make the extensions heavy and visible.
Heat Styling Tips for Ombre Extensions
- Always apply heat protectant spray before using any hot tool — the bleached lighter ends are more vulnerable to heat damage
- Keep the temperature at 150-180°C (300-350°F) for extensions — lower than you’d use on natural hair
- Curl away from the face for the most natural movement
- Avoid applying heat directly to clip attachment points or tape bonds
Care and Maintenance Guide
The lighter ends of ombre extensions are bleached, which makes them drier than single-colour extensions. Proper care directly extends their lifespan.
Washing Ombre Extensions the Right Way
- Detangle gently with a wide-tooth comb before wetting
- Use lukewarm water — never hot — and let it flow in the natural direction of the hair
- Apply a sulfate-free shampoo to the mid-lengths and ends only. Avoid rubbing or bunching the hair
- Condition generously from mid-length to tips. Leave on for 5-10 minutes
- Rinse with cool water to seal the cuticle
- Pat dry with a microfiber towel — never rub or wring
- Air dry whenever possible. If blow-drying, use a low heat setting
Washing frequency: Clip-in extensions need washing every 15-20 wears. Tape-in and sew-in extensions should follow your regular wash schedule (every 2-3 days), with extra care around the bonds.
Use a purple shampoo once every 2-3 washes if your ombre ends are blonde or ashy — it neutralises yellow-brass tones and keeps the colour vibrant.
Storage and Long-Term Care Tips
- Brush before storing — detangle from ends to roots with an extension-safe brush
- Store flat or hanging — never crumple clip-in extensions into a drawer. Use a satin pouch, hanger, or dedicated extension carrier
- Apply a leave-in conditioner or serum to the lighter ends weekly to combat dryness from the bleaching process
- Avoid chlorine and saltwater — both strip colour and dry out processed hair. If swimming, wear a protective cap or braid the extensions
Common Mistakes to Avoid with Ombre Extensions
- Choosing based on end colour alone — The root colour match matters more. If the top doesn’t blend, the entire look fails
- Skipping the undertone check — A warm-toned ombre on cool-toned skin creates an unflattering clash
- Washing too frequently — Over-washing strips moisture from the already-bleached lighter ends, accelerating damage
- Using regular (sulfate-heavy) shampoo — Sulfates are harsh on both the colour and the hair cuticle. Always go sulfate-free
- Ignoring the weight limit for your hair type — Sew-in and keratin extensions on fine hair can cause breakage and traction alopecia over time
- Storing wet or damp — Moisture trapped in stored extensions breeds mildew and weakens adhesive bonds
If you notice scalp irritation, unusual shedding, or pain around your extension bonds, remove the extensions and consult a professional stylist or healthcare provider.
Who Should (and Shouldn’t) Get Ombre Extensions
Best For:
- First-time colour experimenters — Try lighter ends without the chemical commitment
- Event-ready transformations — Clip-ins deliver a dramatic look in under 10 minutes
- Low-maintenance style lovers — Dark roots blend with natural regrowth, minimising visible grow-out
- Volume seekers — Ombre extensions add both colour dimension and thickness
Not For:
- Very fine or thinning hair — Sew-in and keratin methods create too much tension. Stick to lightweight clip-ins if you proceed
- Anyone wanting a single solid colour — Ombre is a gradient by definition. For uniform colour, choose single-shade extensions
- Those unwilling to invest in care — Bleached ombre ends need regular conditioning to stay soft. If you’ll skip maintenance, the extensions will deteriorate quickly
Final Verdict
Ombre hair extensions remain one of the easiest, lowest-risk ways to add multi-tonal depth to your hair without permanent chemical changes. The key is matching the right extension type to your lifestyle and choosing a shade that complements — rather than fights — your natural undertone.
For most people, clip-in ombre extensions are the best starting point. They’re affordable, require no salon visit, and let you test the ombre look before committing to semi-permanent or permanent methods. If you wear extensions daily and want a seamless blend, tape-ins offer the best balance of natural appearance and durability.
Whatever you choose, invest in Remy human hair, match your root colour precisely, and treat the bleached ends with consistent conditioning. Do that, and your ombre extensions will look salon-fresh for months.
Frequently Asked Questions
Q: What is the difference between ombre and balayage hair extensions?
A: Ombre extensions feature a uniform horizontal gradient from dark roots to lighter ends across the entire hair. Balayage extensions have freehand-painted highlights scattered throughout for a softer, sun-kissed effect. Ombre creates a bolder contrast; balayage creates subtle dimension.
Q: How long do ombre hair extensions last?
A: Clip-in ombre extensions last 3-6 months with proper care. Tape-ins last 6-8 weeks between reapplication (wefts reusable for 4-8 months). Sew-ins last 6-8 weeks per install. Keratin bonds last 3-5 months. Lifespan depends heavily on care routine and hair quality.
Q: Can I heat style ombre hair extensions?
A: Yes — if they’re made from Remy human hair. Use a heat protectant and keep temperatures at 150-180°C (300-350°F). The lighter bleached ends are more heat-sensitive, so use the lower end of that range on the tips. Synthetic extensions cannot be heat-styled.
Q: How do I choose the right ombre shade for my hair?
A: Start by matching the extension’s root colour to your natural hair — this is the most critical step. Then choose your desired end colour based on your skin’s undertone: warm undertones suit caramel and honey blondes; cool undertones pair with ash and platinum shades. Always check the match in natural light.
Q: Are ombre extensions bad for your natural hair?
A: Not inherently. Clip-in and tape-in extensions cause minimal damage when applied and removed properly. Sew-in and bonded methods carry higher risk if installed too tightly or left in too long — the tension can contribute to traction alopecia. Choosing the right method for your hair type is essential. This information is for general guidance only and is not a substitute for personalised medical advice about hair loss or scalp conditions.
Q: What are the best ombre extensions for thin hair?
A: Clip-in extensions with fewer, lighter wefts are the safest choice for thin or fine hair. Seamless and single-weft clip-ins distribute weight more evenly. Avoid sew-in and heavy keratin methods, which place too much tension on delicate strands. Tape-ins can work if installed by an experienced stylist using thinner sections.
About Marketingsguide
Marketingsguide publishes practical, easy-to-understand content on health, technology, business, marketing, and lifestyle. Articles are based mainly on reputable, publicly available information, with AI tools used only to help research, organise, and explain topics more clearly so the focus stays on real‑world usefulness rather than jargon or unnecessary complexity.